 Physix Frontier
WorkBuddy Desktop: Create task and ask questions - Illustrated tutorial

WorkBuddy Desktop Edition: Creating New Tasks & Asking Questions · Illustrated Tutorial
Applicable Version: WorkBuddy 5.5.4 (Windows Desktop). All screenshots below are from the actual local interface.
Preparation
Double-click the WorkBuddy icon on your desktop/start menu to launch it, and wait for the main interface to load. If prompted to log in during first use, please log in with your account before proceeding.
Step 1: Enter "New Task"
Look at the top of the left sidebar; the first button with a ⊕ icon is New Task. Click it to start a brand-new session; the app defaults to this page upon startup, so you can also just type your question directly.
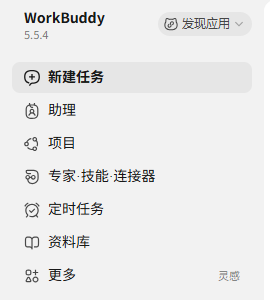
| Entry | Purpose |
|---|---|
| New Task | Start a one-off session to work |
| Assistant Config | Role-based assistants |
| Projects | Group related tasks into a project space for long-term tracking |
| Experts/Skills/Connectors | Attach professional capabilities / external system connections to tasks |
| Scheduled Tasks | Run specific questions automatically on a cycle |
| Library | Store reference files, cite them with @ when asking |
Step 2 (Optional): Select Scenario and Quick Categories
Above the input box, there are three scenario switches: Daily Office / Code Development / Design Creative, which change the answer style and available tools. Below that is a row of quick categories (Document Processing, Financial Services, Data Analysis & Visualization, Personal Workspace, Slides, Deep Research, Video Generation...); clicking one automatically imports the corresponding prompt template, suitable for beginners who don't know how to start.

Step 3: Input Your Question
Click the large input box in the middle (placeholder text: "What can I help you with today?") and start typing. There are several useful features in this input line; it's recommended to learn them all at once:

- @ Cite Files: After typing @, you can select files from the library or local storage, letting it answer based on your materials, e.g., "@2026Q2FinancialReport.xlsx summarize three risk points"
- / Invoke Skills & Commands: Typing / brings up installed expert skills, applying professional workflows directly to this query
- + Bottom Left: Add attachments like images/documents
- Hy4 preview Bottom Right: Switch models; use default for normal tasks, switch to stronger ones for complex reasoning
- Microphone: Voice input
- Bottom "Select Workspace": Determines which local directory output files land in; recommended to pre-select by project, don't pile everything in the default directory
- Bottom "Default Permissions": Controls whether it can read/write files, execute commands, etc.; pay attention to authorization prompts here when running tasks involving local file operations for the first time
Step 4: Send
The circular ↑ button at the bottom right of the input box is the send key (grayed out and unclickable if no content is entered). You can also press Enter to send directly; use Shift + Enter for line breaks.
Step 5: Follow Up on Results & Continue Asking
After sending, a new record appears in the "Tasks" list on the left. Click it to view the execution process, output files, and intermediate steps. Continuing to input within the same task counts as follow-up questions, with context automatically included; to start a new topic, return to Step 1 and click "New Task." Historical tasks can be retrieved from the list anytime without re-describing the background.
FAQ
- No response after sending / Spinning forever: Check if there are network or quota notifications in the bottom right; try switching the model back to default
- It can't read my files: Confirm you added them via @ or +, rather than just writing the path in text; check if "Default Permissions" allow access to that directory
- Can't find output files: Go to the directory set in "Select Workspace"; they won't be on the desktop
- Want to run the same question automatically every day: Use "Scheduled Tasks" in the sidebar, instead of manually creating new tasks daily

