 Physix Frontier
WorkBuddy Desktop Edition: Creating Tasks and Asking Questions · Illustrated Tutorial
WorkBuddy Desktop Edition: Creating Tasks and Asking Questions · Illustrated Tutorial
Applicable Version: WorkBuddy 5.5.4 (Windows Desktop). All screenshots below are from the actual local interface.
Preparation
Double-click the WorkBuddy icon on the desktop/start menu to launch it, and wait for the main interface to load. If prompted to log in during first use, please log in with your account before proceeding.
Step 1: Enter "New Task"
Look at the top of the left sidebar. The first button with a ⊕ icon is New Task. Click it to start a brand-new session; the app defaults to this page upon startup, so you can also just type your question directly.
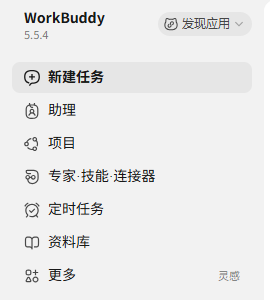
Entry Point | Purpose
New Task | Start a one-off session to get work done
Assistant Config | Role-based assistants
Projects | Group related tasks into a project space for long-term tracking
Experts/Skills/Connectors | Attach professional capabilities / external system connections to tasks
Scheduled Tasks | Run specific queries automatically on a cycle
Library | Store reference files to cite via @ in prompts
Step 2 (Optional): Select Scenario and Quick Categories
Above the input box, there are three scenario switches: Daily Office / Code Development / Design Creative, which change the response style and available tools. Below that is a row of quick categories (Document Processing, Financial Services, Data Analysis & Visualization, Personal Workspace, Slides, Deep Research, Video Generation...), clicking one automatically loads the corresponding prompt template, suitable for beginners unsure how to start.

Step 3: Input Your Question
Click the large central input box (placeholder: "How can I help you today?") and start typing. There are several useful features in the input row recommended to learn all at once:

- @ Reference Files: Type @ to select library or local files, allowing it to answer based on your materials, e.g., "@2026Q2_Financial_Report.xlsx Summarize three risk points"
- / Invoke Skills & Commands: Type / to summon installed expert skills, applying professional workflows directly to this query
- Bottom Left +: Add image/document attachments
- Bottom Right Hy4 preview: Switch models. Use default for ordinary tasks; switch to stronger ones for complex reasoning
- Mic: Voice input
- Bottom "Select Workspace": Determines where output files land locally. Recommended to set per project beforehand; don't pile everything in the default directory
- Bottom "Default Permissions": Controls whether it can read/write files, execute commands, etc. Pay attention to authorization prompts here when running tasks involving local file operations for the first time
Step 4: Send
The circular ↑ button at the bottom right of the input box is the send key (grayed out and unclickable when empty). You can also press Enter to send; use Shift + Enter for line breaks.
Step 5: Follow Up Results and Continue Asking
After sending, a new record appears in the left "Tasks" list. Click it to view execution processes, output files, and intermediate steps. Continuing to input within the same task constitutes a follow-up, with context automatically carried over; to start a new topic, return to Step 1 and click "New Task." Historical tasks can be retrieved from the list anytime without re-describing background.
FAQ
- No response / Spinning indefinitely: Check network or quota indicators at bottom right; try switching model to default tier again
- Can't read my files: Confirm they were added via @ or +, not just written as paths in text; check if "Default Permissions" allow access to that directory
- Output files not found: Look in the directory set under "Select Workspace," not on the desktop
- Want to run same query daily automatically: Use sidebar "Scheduled Tasks," instead of manually creating new tasks every day